
The 1997 Goldwing1500 is known for its reliable performance and classic design. However, like any machine, it can run into electrical issues that need attention. One common issue is a faulty fuel relay. In this comprehensive guide, we’ll cover everything you need to know about how to replace a fuel relay on a 1997 Goldwing1500. Whether you’re a seasoned mechanic or a DIY enthusiast, this step-by-step guide will help you restore your bike’s performance safely and efficiently.
Understanding the Fuel Relay and Its Importance
What is a Fuel Relay?
A fuel relay is a critical component of your Goldwing1500’s electrical system. It functions as an electronic switch that controls the flow of electricity to the fuel pump. When your bike’s ignition is turned on, the relay sends power to the fuel pump, ensuring that the engine receives a consistent fuel supply.
Why Replace the Fuel Relay?
Over time, the fuel relay can wear out or develop issues due to heat, vibration, and electrical surges. Signs of a failing fuel relay include:
- Intermittent engine starting problems
- Unexpected stalling while riding
- Fuel pump not engaging when the engine is running
A malfunctioning fuel relay can lead to poor engine performance, decreased fuel efficiency, and in some cases, damage to the fuel pump. Replacing the fuel relay promptly can prevent these issues and keep your Goldwing1500 running smoothly.
Tools and Materials You Will Need
Before you begin the replacement process, gather the following tools and materials:
- A new fuel relay compatible with the 1997 Goldwing1500
- A set of screwdrivers (both flathead and Phillips)
- Socket wrench set
- Electrical contact cleaner
- Multimeter for testing electrical connections
- Protective gloves and safety glasses
Having all your tools on hand will ensure that you can work efficiently and safely without interruptions.
Step-by-Step Guide: How to Replace a Fuel Relay on a 1997 Goldwing1500
Step 1: Preparation and Safety Measures
Before starting any work on your motorcycle’s electrical system, it is essential to take proper safety precautions:
- Disconnect the Battery: Always disconnect the battery before working on electrical components to prevent accidental shorts or shocks.
- Work in a Clean, Well-Lit Area: This will help you avoid losing small parts and ensure you can see all connections clearly.
- Wear Protective Gear: Safety glasses and gloves can protect you from sparks or debris.
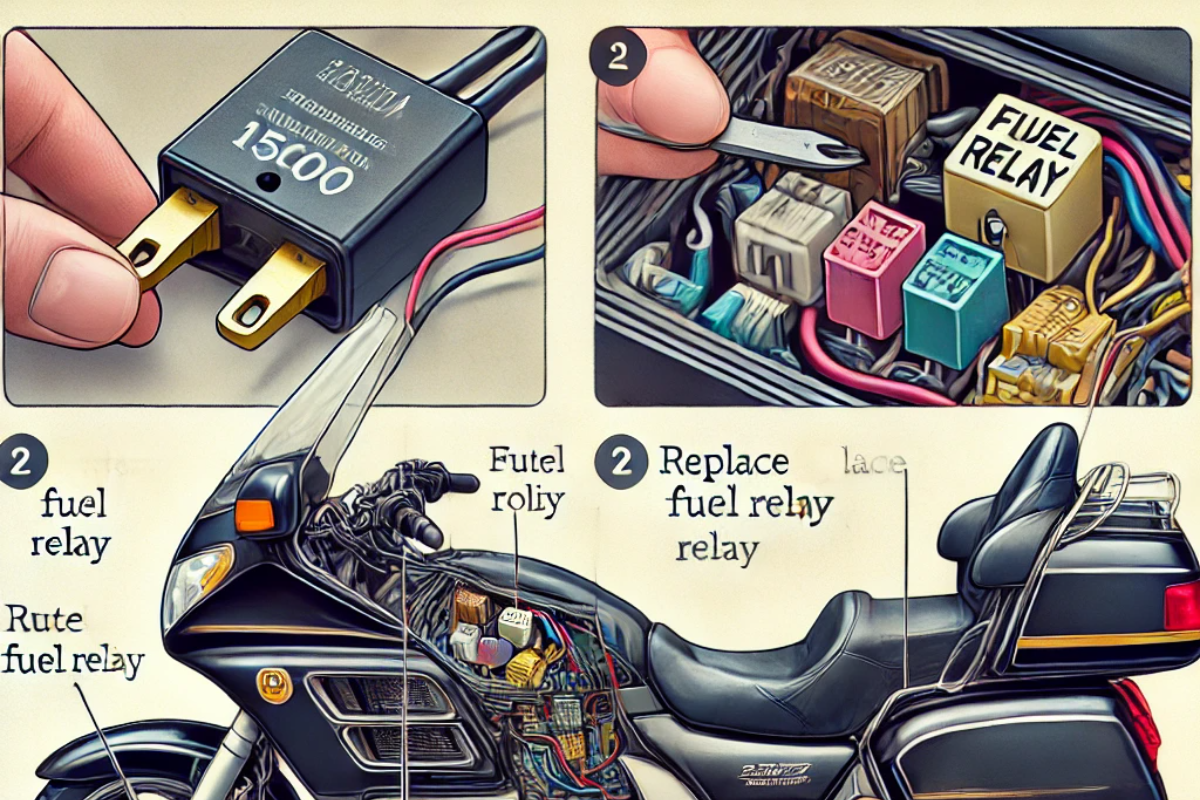
Step 2: Locate the Fuel Relay
The fuel relay is typically found in the fuse box or relay panel. On the 1997 Goldwing1500, you can locate it by consulting your owner’s manual, which should provide a diagram of the relay panel. Look for a relay labeled “Fuel” or “Fuel Pump.”
Step 3: Remove the Faulty Fuel Relay
Once you have located the fuel relay, follow these steps:
- Remove the Fuse Panel Cover: Use a screwdriver to carefully remove any screws securing the panel cover.
- Identify the Fuel Relay: Check the diagram or labeling on the panel to identify the fuel relay.
- Disconnect the Relay: Gently pull out the faulty fuel relay. In some cases, you may need to disconnect wiring harnesses or unscrew connectors. Be careful not to damage any wires.
- Inspect the Relay: Examine the relay for any signs of physical damage, corrosion, or burnt components. This inspection can provide clues about why the relay failed.
Step 4: Install the New Fuel Relay
Now that you have removed the old relay, it’s time to install the new one:
- Compare the Old and New Relays: Ensure that the replacement relay matches the original in terms of shape, size, and connector type.
- Clean the Connection Points: Use electrical contact cleaner on the relay sockets to remove any corrosion or dirt that might interfere with the new relay’s operation.
- Insert the New Relay: Firmly place the new fuel relay into the socket, ensuring it is properly seated. If there are wiring harnesses attached, secure them firmly to the relay’s connectors.
- Replace the Fuse Panel Cover: Once the relay is installed, carefully reattach the fuse panel cover and secure it with the screws.
Step 5: Test the New Installation
After installing the new fuel relay, it is crucial to verify that it functions correctly:
- Reconnect the Battery: Attach the battery cables back to your Goldwing1500.
- Turn the Ignition On: Listen for a click or check the dashboard to ensure that the relay activates.
- Use a Multimeter: Test the relay with a multimeter by checking for continuity and ensuring that the electrical flow is correct when the ignition is turned on.
- Check Fuel Pump Operation: Start the engine and verify that the fuel pump is working correctly. The engine should start without issues and run smoothly without any stalling or intermittent power loss.
Troubleshooting Common Issues
Even after following the replacement procedure, you may encounter some common issues:
- Relay Doesn’t Engage: Double-check the wiring connections and ensure that the new relay is compatible with your bike’s system.
- Engine Performance Issues: If the engine still struggles to start or run smoothly, inspect other components of the fuel system such as the fuel pump and fuel filter.
- Electrical Short: If you notice any unusual electrical activity or smell burnt plastic, disconnect the battery immediately and inspect the wiring for any potential shorts.
Additional Maintenance Tips for Your Goldwing1500
Regular maintenance can extend the life of your motorcycle and prevent issues like a faulty fuel relay. Here are a few tips:
- Regular Inspection: Periodically inspect your electrical components and wiring for signs of wear or damage.
- Keep the Fuse Box Clean: Dust and debris in the fuse box can interfere with the operation of relays. Clean the area during routine maintenance.
- Update Your Owner’s Manual: Always refer to your owner’s manual for model-specific recommendations and maintenance schedules.
- Monitor Fuel Quality: Poor-quality fuel can cause clogs and damage to the fuel system. Use high-quality fuel and consider adding a fuel system cleaner periodically.
Why SEO Optimization is Important for DIY Guides
Creating an SEO‑optimized article like this one not only helps motorcycle enthusiasts find the information they need but also improves your website’s search engine ranking. Here are a few reasons why SEO is critical:
Improved Visibility
When someone searches for “how to replace a fuel relay on a 1997 Goldwing1500,” your article can appear at the top of search engine results pages (SERPs) if optimized correctly. This improved visibility drives more traffic to your site.
Enhanced Credibility
Detailed, step‑by‑step guides that include troubleshooting tips, safety advice, and maintenance recommendations build trust with your audience. When readers know they can rely on your expertise, they are more likely to return for future updates and recommendations.
Increased Engagement
Well‑structured articles with clear headings, bullet points, and concise instructions keep readers engaged. Engaged readers are more likely to share the content on social media, which further boosts your site’s authority and SEO ranking.
SEO Best Practices Applied in This Guide
To ensure that this guide is SEO‑optimized for the keyword “how to replace a fuel relay on a 1997 Goldwing1500,” several best practices were followed:
Keyword Placement
- Title and Headings: The primary keyword appears in the title and multiple headings, ensuring relevance to search queries.
- Introductory Paragraph: The opening paragraph mentions the keyword naturally, setting the stage for the detailed content that follows.
- Throughout the Content: The keyword is interwoven into the content in a natural and informative manner, avoiding keyword stuffing while reinforcing the article’s topic.
Content Structure
- Clear Headings and Subheadings: Breaking the content into sections with descriptive headings helps both readers and search engines understand the structure and key topics of the article.
- Bullet Points and Numbered Lists: These elements enhance readability and make it easier for readers to follow the step-by-step process.
- Conclusion and Additional Tips: Including a conclusion and extra maintenance tips ensures that the article is comprehensive, addressing not only the replacement process but also related maintenance topics.
Multimedia Integration (Optional Enhancements)
For an even more engaging user experience, consider incorporating images or diagrams that illustrate:
- The location of the fuel relay in the fuse box
- Step‑by‑step removal and installation process
- Tools required for the job
Visual aids can further enhance the article’s usability and help readers follow the instructions more easily. If you add images, remember to optimize the image filenames and alt text with relevant keywords such as “fuel relay 1997 Goldwing1500 replacement” to further boost SEO.
Conclusion
Replacing a fuel relay on a 1997 Goldwing1500 might seem daunting at first, but with the right tools and detailed guidance, it can be a manageable task for most DIY enthusiasts. This guide has provided you with a step‑by‑step process, from safely disconnecting the battery to testing the new installation, ensuring you have all the information you need to successfully replace the faulty fuel relay.
By following these detailed instructions and implementing regular maintenance tips, you can ensure that your Goldwing1500 continues to perform at its best. Not only will this improve your bike’s reliability, but it will also enhance its overall performance, keeping you on the road with confidence.
Remember, if you encounter any issues during the process or if you’re unsure about any steps, it’s always a good idea to consult a professional mechanic or refer to the manufacturer’s guidelines. With careful attention to detail and the proper safety measures, replacing a fuel relay on a 1997 Goldwing1500 can be a straightforward and rewarding DIY project.